Tuesday, 3 November 2020

Sony TC-K61 Take Up Reel Spindle

 *** Sony TC-K61 Reel Spindles ***

*Updated: 08/06/2022 - see end of article.

The Sony TC-K61 pictured (top), with the TC-K35 (bottom).


Cassette Deck Reel Spindles


Service Manual Description
 

The supply reel spindle (left) has an adjustable 'back tension' facility as illustrated.

Problem

The take-up reel spindle (right) is driven by a idler tyre which eventually wore smooth, and so was less 'grippy' when engaged with the driver from the flywheel assembly. It didn't take much 'loadling' to stop the machine.

Solution

Initially I 'cleaned' the rubber idler tyre with 'Rubber Renew', I had prevously used Isopropyl Alcohol - which worked for a while. However, even the highly rated Rubber Renew had limited success, so I decided to 'rough up' the idler tyre with fine emery paper. This 'opened up' the tyre to the Rubber Renew chemistry, and after another cleaning session, the take-up reel spindle now exhibits strong torque. 

As good as new? - time will tell.

3/11/2020: Article is subject to alterations.


Take up Spool Idler Tyre Fitted

8th June 2022


To remove the gear, I had to remove a plastic 'retainer' washer,
which I carefully removed with forceps.
The old tyre's rubber had become hard and slippy.
 

Replacing the idler tyre and gear was not easy.
I didn't want to 'disturb' the take up spool assembly
and risk breakage.
So I compressed the rubber tyre past the
spool's gear using a thin knife and
turned the assembly until it fell
into place.


Take up spool tension now fully restored!


Tuesday, 20 October 2020

Capacitor Loading on OP Amps


Update, 21/10/2020: The TL071 OP Amp's open loop frequency response and phase shift was obtained from the TL071 data sheet online. It's frequency response resembles an amplifier with high DC gain, and with one low frequency pole, ie -3dB point.

My experimental headphone amplifier (Headphone Amp) has one TL071 in a non-inverting, unity gain configuration. On examining the data sheet, one can see that at unity gain, the TL071 has a bandwidth of approximately 4Mhz. Also, from a stability point of view, note the phase shift at 4Mhz at around -100°!

With the inclusion of a 1.5nF load capacitor CL, it is no surprize then that the amp was destabilizing. My temporary circuit layout must have also possessed sufficient parasitic capacitance to render the TL071 almost unuseable. Removing the 1.5nF additional load returned the amp to stability.


21/10/2020: Subject to corrections, and additions.


Friday, 9 October 2020

KEF 104-2 Floor Standing Speakers

 KEF 104-2 Floor Standing Speaker

Tweeter Replacements


Click on the images to magnify - applies to all.
 

By chance I spotted a youtube video showing one method to replace an ageing or blown dome KEF T33 tweeter on the KEF 104.2 floorstanders - this reminded me to do something about mine. The video here shows how one guy fixed his tweeter problem with a set of Morel MDT29s.  Morel MDT29 Tweeters

I've had my KEF 104.2s since about 2002/2004, and it wasn't long after I blew the tweeters. A temporary solution by my brother-in-law fixed the issue, a direct KEF T33 (SP1191) replacement was not easily available even at this time.

Yesterday, I mulled over several replacements, and finally decided on the french Audax TWO25A2 textile dome tweeter, since they seemed to have a similar spec to the T33s, and would probably fit without too much intervention?


KEF T33B tweeter specification - similar to the T33?

Audax TWO25A2: The sensitivity or output of the 4Ω tweeter from the official specs is stated at "93dB at 1W at 1 metre", although some sources quoted these Audax tweeters at 90dB? 

At 1 Watt input, I can only assume that Audax are using P=V²/R, where V is RMS volatge, and R is the 4Ω loading. This equates to: 1 = V²/4, or V² = 4, ie V = 2V rms.

Then for the Audax: 2V rms → 93dB output

Morel MDT40: The temporary fitted tweeters back in 2002/2004 were the Morel MDT40s: wired in twos, in parallel to mimic a 4Ω load to the amplifier and crossover unit. 

However, each MDT40 tweeter was still an 8Ω load and was sinking AC audio current as per specification - delivering the quoted "89dB at 1W, at 1metre" distance 

So then, delivering 89dB loudness for 1W input suggests ...

from P=V²/R,  1=V²/8, or V=√8, 

ie V=2.83v.

 Then for the Morel: 2.83V rms → 89dB output

As a comparison then, by my calculation if the Morel was subjected to 'only' 2V rms, then the output would be less than the 89dB figure. If these specs are to be believed, the difference I experienced must have been at least -4dB, ie the Morel output was down. 

As a mathematical suggestion, I may have experienced a further drop from the Morel of 20·Log(2v/2.83v) or -3dB? In total then, perhaps approximately -7dB?

Perceptively, back in 2002/2004 I noticed the treble was down - but I simply got used to it.


The new Audax TWO25A2 4Ω Tweeter


And here again is the Audax TWO25A2 with its face plate removed, and plastic voice coil carefully fastened into place.


Note: flash photography may give the appearance that the dome is distorted - it is not.


Here the Audax TWO25A2 is ready to replace the old tweeter before soldering - my advice is to do the soldering first.

 
The countersunk screw heads may look a little 'proud', but the tweeters 'seated' nicely once installed, and indeed the screw heads acted as an additional grip. The locking plate in the background slides over and the tweeter can be centered and stabilized thanks to the fastening and centering screw. I may later devise a 'cushioning' interface between the Audax tweeter and the tweeter port on the 104/2 baffle?
 

Voice Coils

I think it's best to carefully solder with the voice coils removed - very easy and convenient.


Re-assembly

Not an issue, there was plenty of room to slide the Audax tweeters in. The depth of these tweeters is quoted at just over 23mm, not including the face plate.


There is a red marking on the tweeter to signify 'positive'. 
As it's AC we are concerned with in audio, 
can this only act as a guide so that we avoid 
phasing errors between left and right channels?

Remounting the Baffle on to the Main Cabinet

With the tweeters secured and centered it was time reassemble the driver unit.


And finally ...


In use the speakers have come to life - upper midrange and treble re-defining the sound image. So far, so good, I am very happy!

Unanswered Questions

(a) Flatness of Crossover  

There is a question concerning the original midrange driver frequency response merging with the Audax TWO25A2's response. At the intersection or crossover frequency - is there a rise, a fall, or is the frequency response reasonably flat?

(b) New Tweeter Power Handing

The power handling capacity of the Audax TWO25A2 is quoted at 55W RMS/DIN?, this is seemingly much less than the handling capabilities of the KEF T33? 

However, is that an issue? My Sony TA FB-940R amplifier can theoretically deliver up to 120W into 4Ω, but much of transient music spectral power (individual sinewave component powers) naturally fall off with frequency - something approximating to a 1/f power spectra, much like 1/f  'flicker noise'. 

Whats does this mean? Well, it means this - with a doubling of frequency, then expect approximately half the power to be present in the corresponding doubled frequency component.

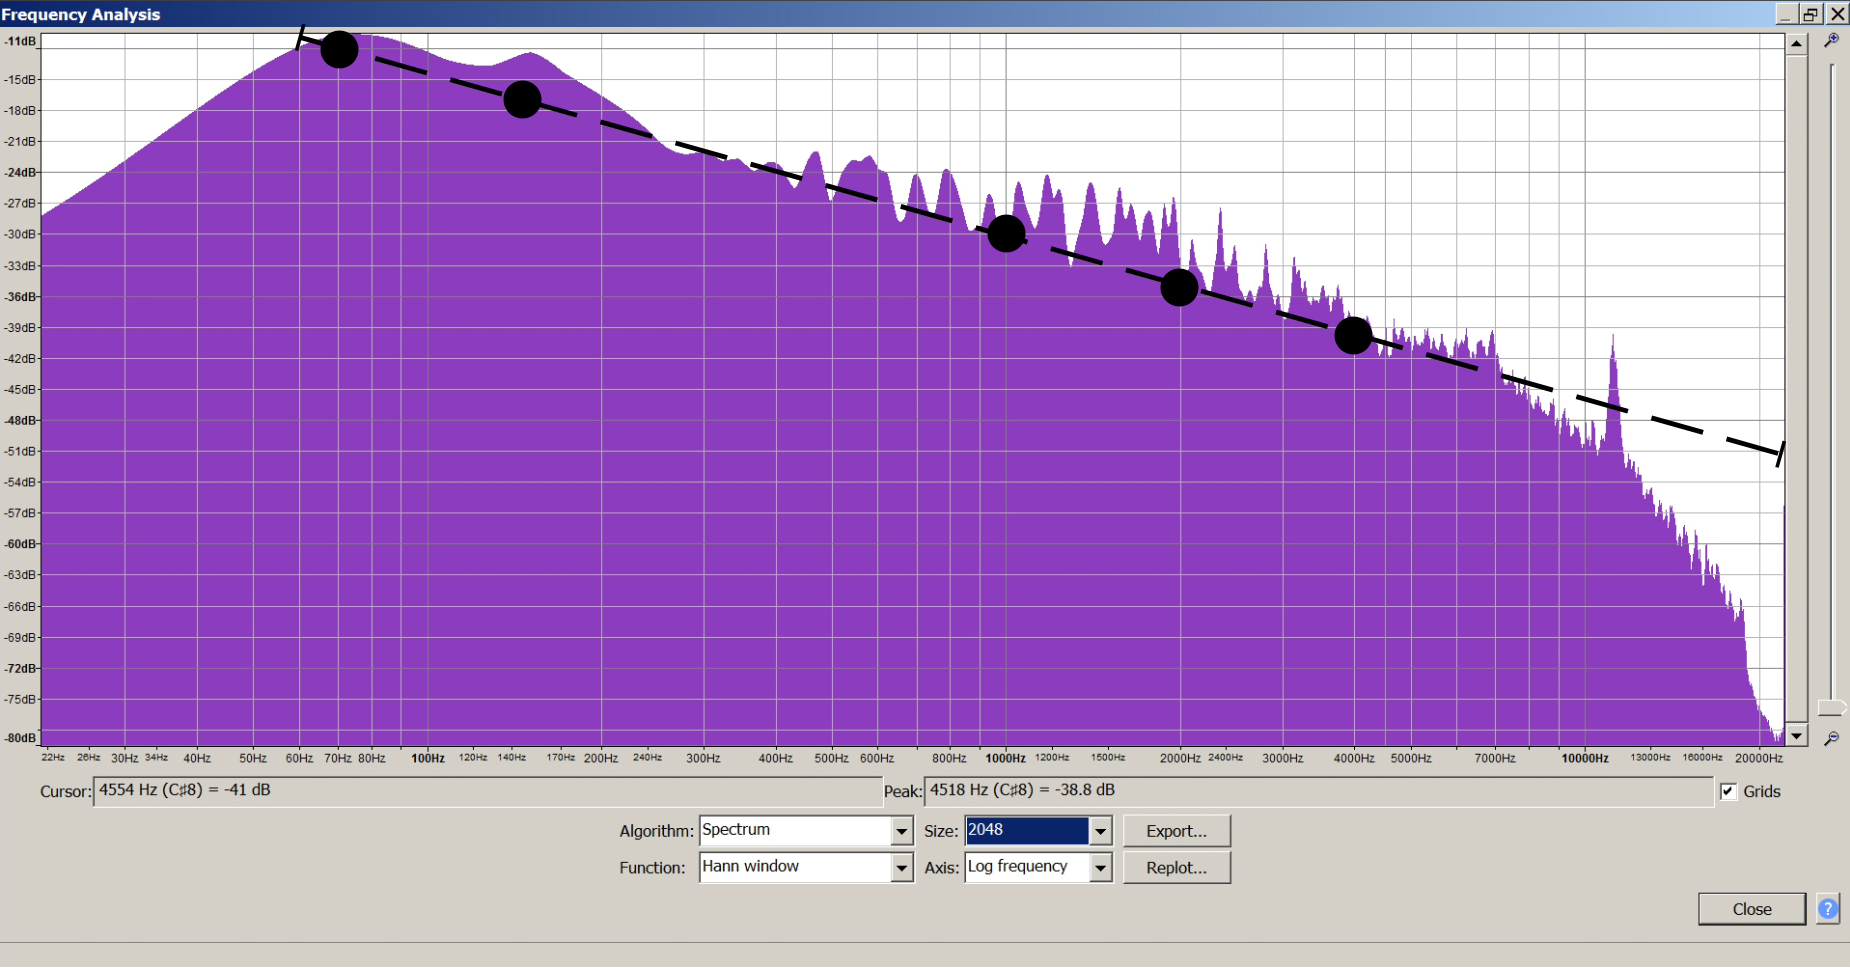
As a small demonstration of the spectral power amplitudes in music, below is a 30 second Fast Fourier Transform from Elton John's "Philadelphia Freedom".


The frequency density plot from Audacity
seems to be based on (voltage) amplitude of each
spectral frequency component, not explicitly power.
In amplitude terms this is: 6dB drop per octave,
or if computed for power: 10dB per decade.

In truth, I'll never drive the KEF 104/2 hard on the TA FB-940R - about '10:30' on the volume dial and the room is starting to resonate!

Finally, here is an online video worth watching ... KEF 104.2 Full Service


Minor corrections and revisions ...

12/10/2020, 13/10/2020, 11/07/2022.

14/10/2020 (speaker sensitivity clarified)


Monday, 21 September 2020

Headphone Amplifier Design and Experiment

 Headphone Amplifier Design & Experiment.


So far my circuit -

Headphone Amplifier V0.1


LM 741 OP Amp at Buffer Stage

The slew rate of the LM741 is limiting the amplifier to about 40Khz sinewave, at about 2 volts (peak) into a 33 ohm load. 

This finding ties in nicely with the theory which states - the maximum frequency of a sine wave (before Slew Induced Distortion) delivered at the output is limited by the OP Amp's ability to dump charge Q into a load.

 The 741's quoted slew rate is 0.5v/us, or 500v/sec.

Applying the accepted guide of ...  SR = Vp·2𝝅·f

and rearranging for frequency f gives ... f = SR/[2𝝅·Vp], 

that is ...

f = 500,000/[2*3.142*2] = 39,788Hz.

DC Voltage Offset

The unwanted (although non-audio affecting) DC offset at the output of the bi-polar transistor designed LM741 was reduced by applying two same-valued resistors both at the output, and at the V+ input terminal. This DC offset is caused by internal bipolar transistor bias currents - the effects of which are to produce undesirable DC input to the OP Amp. The OP Amp amplifier section also 'sees' this DC offset at the input and amplifies it. To overcome this problem, creating an equal quiescent DC bias voltage (thanks to these resistors) at both V- and V+ then cancels out the undesired effect, or at least minimises it.

The LM741 DC output offset was reduced to less than 2mV, typically around 1mV or less.

And the output across the 33 'power' load, we have a DC offset of much less than 1mV .... excellent, typically 100uV or less.

LF411CN or TL071 at Buffer Stage

Replacing the LM741 with a JFET LF411CN or TL071 resulted in instability - overshoot on the application of a square wave. and sometimes uncontrollable amplifier oscillatons.


Strong overshoot of a 4Khz Square Wave

Somewhere within the circuit we have a situation where negative feedback from the effective loop gain '𝜷·A' had a near 180 degree phase reversal at approximately unity gain - which is undesirable. 

Without the 1.5nF loading capacitor, the gain with feedback takes the form:

Aᵥ = A/(1+𝜷·A)

where A = Open Loop Gain of the OP Amp,

and  𝜷 = the feedback ratio from an impedance network, but 𝜷 =1 (not proven here) in this voltage follower configuration.

Instability in the form of heavy overshoot and/or oscillations are likely if a near 180° phase shift in the loop gain term 𝜷·A occurs, ie as 𝜷·A → -1.

With the 1.5nF capacitor present, the expression in the denominator changes (this will be studied in another article), and I suspect enough additional phase shift occured which induced instabilty, hence overshoot to square waves and eventual oscillations. Not so with the LM741 OP Amp, but I did note the LM741 still exhibited small, but significant overshoot (fast dying oscillations) on the application of a square wave or pulse.

Removal of the High Pass Filtering 1.5nF Capacitor

Now, removing the 1.5nF capacitor (part of the high pass filtering at midstage) eliminated all instabilities, and now we have a stable headphone amplifier which can deliver (if needed) 500mW into either 33 or 8.

Slight overshoot at 4Khz, but the amplifier is very stable.

With the LF411CN in place, the unwanted, but non-distructive DC voltage offsets at ... 

(a) First OP Amp buffer output < 1mV, 

(b) Voltage across 33 or 8Ω load, < 1mV.

The amp is able to deliver more than 500mW into 8Ω if the regulated voltages are raised above ±12v respectively.

Frequency response is better than 15Hz .. 100Khz  ±1dB for 'clean' sinusoidal waves.


V0.2 of the Headphone Amplifier. (Mono)


Unfinished article, subject to changes. 5/10/2020

Update: 9/10/2020. 17/11/2020.

Saturday, 8 August 2020

Sony TC-K35 Cassette Deck

 Sony TC-K35


An ebay purchase, and was in very good condition. Barely any head wear.

Recalibrated the azimuth to my full track ABEX 10Khz reference tape. The difference between previous setting and the reference tape was very small - approximately 90° to 180° degrees at 10Khz.

I also have calibrated the outputs to be equal, and read Dolby Level on playback of a full track ant-audio.co.uk Dolby Level reference recording. Internal record levels (ie, tape sensitivity) calibrated to be equal for both L/R channels, and set to match TDK FE cassette tapes.


8/8/2020.

Monday, 25 May 2020

Shockley Equation Verification

The 1N4148 Diode 
and the 
Shockley Equation.

My next project will be to design from scratch, a functioning and reliable high fidelity stereo headphone amplifier. Although based on a well established Class A-B model, in this project I will seek to derive all the related equations myself. But first there is a matter of investigating the 1N4148 diode (as one example), and its V-I characteristic.

There must be several such suitable diodes I could use to control the biasing of the eventual Class A-B push-pull headphone amplifier.

Below is a table showing forward bias I-V measurements I took, the input voltages varied from 0.575v to 0.835v.

I (mA)
0.393
0.644
1.060
1.747
2.680
4.160
6.340
9.520
13.900
19.540
26.485
30.614
V (volts)
0.575
0.600
0.625
0.650
0.675
0.700
0.725
0.750
0.775
0.800
0.825
0.835


Basic Diode Action

Under forward bias configuration (as shown) the
width of the contact potential is narrowed as electron current
is swept across the junction.

William Shockley Equation

According to the Shockley Equation, the relationship between forward bias diode voltage and diode current for a PN junction diode is ...


Where IO = reverse saturation current,  Io = 25*10-9 for the IN4148
VT= KT/q ... thermal equivalant of voltage, 
K = boltzmann constant, T = absolute temperature, q = electron charge.  
And at 20C VT ~ 0.025v

n= ideality factor, 
n=1 for a perfect diode, but often n = 1.. 2.5

From my empirical results, I wanted to establish n, and by ignoring the '-1' term, and rearranging I obtain ...


For the 1N4148 data above, I calculated the mean value of  n, that is ...

n = 2.351 

(to 4 significant figures)

With that I plotted the data vs the Shockley Equation model .... 


The correlation was remarkably good, better than I had anticipated! 

Monday, 11 May 2020

Matsushita DC Motor

AN6652 Matsushita 
DC Motor Circuit Investigation,
but No Modification.

I have another identical Matsushita motor where I decided to examine the motor controller circuit - this time based on the (later?) AN6652.


Before I took the back off, I had to de-solder a tag which connected the metal casing to the ground point. The casing is now electrically neutral to both ground (or -ve) and +Vcc. If in doubt, I would suggest we do this before attaching a similar motor to any cassette deck.

The circuit above is essentially the same as in the previous AN6651 configuration, except for: a signal diode, C=22uF, and here R1, R2, and R3 all effectively form part of Rs

Rs = R3+R1||R2 (R2 effective).

18/05/2020.

Thursday, 7 May 2020

External Motor Controller Experiment

An External Motor Controller Experiment

Revised 15th May 2020.
(Apologies for the continual editing, the blogger has so many HTML editor bugs)

Traditionally, a brush-type DC 12v motor for a cassette deck has its controller tucked inside the housing of the motor assembly.

I hope to experiment again using the Panasonic or Matsushita AN6651 controller, and applying it to a stripped-out Matsushita DC motor, that is - remove the internal circuit and attempt to control speed externally.

All internal motor control components have been removed.

The motor in question here has the following measured internal parameters at approximately 2400rpm when under loaded conditions within the Sansui SC-1330 during Playback.

Vm=6.71v, Ra=18Ω, Ia=68.5mA

Vm = voltage across the motor brush terminals,
Ra = internal armature resistance, measured before loading.
Ia = armature current at approximately 2400rpm, under 'Play' loading conditons.

The widely accepted mathematical model is shown below.


Ea = generated 'back' electromotive force 'EMF' induced into the armature windings by the fixed internal field magnet. Note that Eaarmature speed n.

From which Kirchoff's Voltage Law applied to the circuit, we have Vm=Ea+Ia*Ra, and from this I deduce that back-emf generated at approximately 2400rpm is Ea ~ 5.38v 

The AN6651 Block Diagram

Turning attention now to the AN6651 ...


Note: a series of 40 (in parallel?) output transistors, these will effectively restore the working or optimal Vm voltage across the brushes of the motor.

And in circuit ...

For the AN6651, the value of K is 40, this appears to be linked to the number of output transistors. Seemingly, every controller of this type has a value for K? The value of Vref for the AN6651, is nominally 1.0 volts - according to the datasheet.

Another similar motor controller is the LA5586, I examined its datasheet. As usual, the guides are very poorly written, but I believe I have managed to decipher how to calculate both Rt and Rs so as to get my Matsushita, or another similar DC motor working under the LA5586, or the AN6651. 


Note: The expression (Is+Ia)/K in the circuit diagram above is a guide and parameter that I have to use - it's highlighted in the LA5586 datasheet. I will assume that this can be applied to the AN6651.

The journey to find Rs begins with a voltage loop equation (from the datasheet) relating system parameters, Kirchoff's Voltage Law here states ...  

Eo + Ia*Ra = Rt(Is(1+K)+Ia)/K + Vref
(Vm = voltage divider/comparitor section)
 
where Is = current through Rs
Substituting Vm for Eo + Ia*Ra

and solving for Is gives ...
Is = (1/K+1)(K/Rt*(Vm-Vref) - Ia)
and since Rs = Vref/Is,  

Rs can be found.

The datasheeet also suggests that I must assign Rt < K*Ra otherwise the system will become unstable.
In this case: Rt < 40*18Ω or < 720. Okay, so I'll go for Rt=680 or lower (I have plenty in stock!)

Calculating Rs 

According to the expression for Is, and setting Rt=680

I obtain ..

Is = (1/41)(40/680*(6.71-1)-0.0685) = 0.00652 A.

Is ~ 6.50mA

As Rs = Vref/Is, and Vref=1v (for this controller), then

Rs ~150

Okay, so I'll try Rs = 47 + 200Ω(variable)  or better try 100 + 100Ω(variable)?

I'll also set Vcc=12v, note that Vcc=Vm+V4.  

==========================================================

After putting this circuit into practice, I modified the ability to alter Rs by introducing a 'coarse' and fine' speed trimmer resistor.


AN6651 based circuit soldered on to 'stripboard'


Later the circuit was electrically isolated, moved away from the transformer and secured into place using plastic ties.

The good news is the motor controller works!, however - at this time other thoughts cross my mind...

Temperature Coefficient of Resistance?
There is another issue for me to factor in - an increase in motor resistance Ra with temperature as the motor begins to heat up! That is - what is the coefficient of temperature of Ra, and will this upset the running speed over a period of time?

Will I have to position Rs close to the motor so the ratio of Ra/Rs is maintained?, much like the wheatstone bridge principle. It doesn't appear so, but I'm not 100% certain.

Assuming Rs and the motor are not 'in close contact' - will I need to allow time for the motor to 'warm up' to calibrate its true stable speed? If so, then for how long?

Incidentally, I measured Ra ('cold'): 17.9Ω, and Ra (after 30 minutes of 100mA loading): 18.8Ω.

Findings, so far ...

Speed Calibration Using 3000Hz Test Tape

With a 3Khz test tape positioned at the middle of the tape,  I calibrated the tape speed.

At a 'cold' start up, I calibrated using my 'fine tune' trimmer for maximum stability, then noted the playback speed ...
Playback frequency = 3000Hz ± 1, 2, 3Hz 

After 5, 10, and 15 minutes of running the motor in, so that Ra's temperature was effectively raised ... Playback frequency = 3000Hz ± 3,4,5,6 Hz. The median deviation in frequency was around 4Hz .. 5Hz. I didn't note if the motor was running fast or slow - just the steady difference.

Sometimes it would 'run' to about
± 8Hz/10Hz, but these were possibly down to wow and flutter wobbles, and that I was examining the deviations of speed for a longer period of time? The speed would soon run back to a stable difference of 3,4,5,6 Hz etc.


========================================


Later: I finally decided to have the motor running permantently, much like the Aiwa AD-F770. And after 20 minutes of warm up time, I aligned the speed of the motor to register 3000Hz ± 1,2,3 Hz etc. I am able to set the motor speed to playback exactly 3000Hz, but it is unrealistic to expect this to remain rigid throughout various tape positions. So far the Sansui SC-1330 and its 'new' motor/controller configuration is remaining within a ±0.5% tolerance of its motor speed target.   

Time will tell if having an 'external' ('offline') AN6651 motor controller works effectively?

Please note: Tape speed at the beginning, the middle, and at the end of a tape differ slightly. Calibrating at somewhere about the centre of the cassette tape is said to reduce overall errors. (I can't qualify the apparent speed variation from beginning to the end of a tape - it's based on general forum consensuses)


Power Consumption: The AN6651 is rated at 1.3 watts (1300mW) heatsinked on to conventional circuit board. At average use, the power consumed is largely through the output transistor stages which are employed to regulate Vm, and since Eo = Vm-Ia*Ra, then Eo and hence speed n is regulated. 

An estimation of the power dissipated by the AN6651 is approximately V4*Ia, or (12-6.71)*0.0685, that is 0.362w, and adding internal biasing into consideration, probably around 0.4W or 400mW.

Note: This article is finished, but subject to the correction of minor mistakes or amendments.
 
2/11/2020 - small addition.

***I tend to write in this www.blogger.com directly online, and not offline. The reason? - the blogger editor is full of software bugs, if I prepare and later paste a document into the blogger editor it is filled with formatting errors and colour quirks, hence it is easier to write this way.***
.......